Tuesday 31 May 2016

Simple tricks to disable automatic updates in windows 10(Save your network data )

In this post I will show you the steps to disable automatic updates in windows 10 with detailed description and screenshots. 


In older versions of windows like windows XP/vista/7/8/8.1,it was really easy to disable windows updates from downloading automatically. The option is easily accessible from control panel on older version of windows (see the image below). 


screen shot of windows 7 control panel


But unfortunately Windows update option is not available in windows 10 control panel(see the image below)


screen shot of windows 10 control pannel

There are two methods to disable automatic updates in windows 10,

1.Disable for metered connections only.
2.Disable automatic update for all typed of connections in              registry settings.

1.Disable for metered connections

So, if you don’t want Windows 10 automatically downloading updates on your home network connection, just set it as a metered connection. Windows 10 will automatically download updates when you connect your device to a non-metered network, or when you disable metered connection in pc settings. And yes, Windows will remember this setting for each individual network, so you can disconnect from that network and reconnect all you like.

STEPS

1.Open the Settings app, select Network & Internet, scroll down, and select “Advanced options” below the list of Wi-Fi networks. Enable the “Set as metered connection” option.


note:
This option only affects the Wi-Fi network you’re currently connected to, but Windows will remember this setting for each individual Wi-Fi network.

After enabling this option, Windows Update will say “Updates are available. We’ll download the updates as soon as you connect to Wi-Fi, or you can download the updates using your data connection (charges may apply.)” 

By marking a connection as metered, you’ve tricked Windows into thinking it’s a mobile data connection — for example, you might be tethering your PC to your smartphone. You can click the Download button to download and install updates at your leisure.


2.Disable automatic update for all typed of connections in registry settings.

There’s actually an option that will let you choose how updates are installed on your own schedule, but it’s buried in Group Policy. Only Professional, Enterprise, and Education editions of Windows 10 have access to the Group Policy editor

STEPS

1. To access the group policy editor, press Windows Key + R, type in the following line into the Run dialog, and press Enter:

gpedit.msc


2.Select Administrative templates located at the left bottom of the group policy editor window.


3.Navigate to system folder and click on it.


4. Now double click on windows automatic updates


5.Select “enabled” and click ok button.


  • If you enable this setting, it prohibits Windows from searching for updates.

  • If you disable or do not configure it, Windows searches for updates and automatically downloads them.

Hide hard disk or partition inside windows(XP/VISTA/7/8/8.1/10) without using any software or application

note:You should first sign in using an administrative account for              doing this.


STEP 1: Press window key + R or select Run from start menu                   to launch the Run window.


STEP 2: Type in diskmgmt.msc and press enter key/ok button.

   
   STEP 3 : The disk management windows opens.

 STEP 4 : Right click on the partition/local disk to be hidden                      and select change drive letter and paths


STEP 5 : On the pop-up windows click remove button and then                 click ok 


   Now u can see that no label is displayed on your drive.


  The drive will not be visible in windows explorer ,this PC/My    computer etc. This is the safest way of hiding a whole    partition/local disk since there is no data loss or fragmentation  in this method.

The partition can be made visible by following steps 1 to 4 and then in the pop-up windows click add . Then click ok in the new popup window.


Now you can see that the drive letter or label reappears.


The partition will reappear in  explorer, my computer etc.


Simple way to reduce Computer Vision Syndrome

Have you ever experienced dry eyes tiered eyes,headaches,neck pain or blurred vision while using your PC?Then you might be suffering from Computer Vision Syndrome(CVS).It can affect anyone who spends three or more hours a day in front of computer monitors, and the population at risk is potentially huge.According to report published in Medical Practices and Reviews,70 million workers are affected by CVS. 


Luckily the solution for the problem is quite simple.Just follow six simple steps!

(1) Keep blinking

It washes your eyes in naturally therapeutic tears.

(2) Remember 20-20-20

Every 20 minutes, spend 20 seconds looking at something 20 feet away, minimum.

(3) Get the right light

Good lighting isn’t just flattering – it’s healthy for your eyes. So, keep bright lighting overhead to a minimum. Keep your desk lamp shining on your desk, not you. Try to keep window light off to the side, rather than in front or behind you. Use blinds and get a glare screen. Position the computer screen to reduce reflections from windows or overhead lights.

(4) Monitor your monitor.

Keep it at least 20 inches from your eyes. Center should be about 4 to 6 inches below your eyes. Also, make sure it’s big enough and with just the right brightness and contrast. Adjust the screen so you look at it slightly downward and are about 24 to 28 inches away. Adjust the screen settings to where they are comfortable — contract polarity, resolution, flicker, etc.

(5) Wear those computer glasses

Your doctor can prescribe a pair of eyeglasses just for viewing the computer screen well. If necessary, wear the appropriate corrective lenses while at the computer.

(6) Talk to your doc

Have a comprehensive eye exam by a VSP doctor. During your eye exam, your eye doctor can check for more than just computer vision problems. She’ll look for signs of health conditions like diabetes, high cholesterol, high blood pressure, glaucoma, and macular degeneration. It’s an important part of your overall health routine.

Overwatch: A game with Lots Of Pros And Little Cons !!!!! (PC,PS4,Xbox One)

Overwatch Review

Our Rating:9.6/10


Overwatch is a game in which artistry blends perfectly with design and pure tactical joy meets intelligent design to create a splendid gaming experience.Primarily a game about assessing and reacting, never before have I played a first-person shooter where I’m making so many moment-to-moment decisions: on my positioning, map layout, abilities, character selection, enemy position and even more.


Key Features


  • Available on PS4, Xbox One and PC 
  • Multiplayer-focused 
  • Manufacturer: Blizzard 
  • Price:$40(for PC),$60(for Xbox one and PS 4). 

Official Trailer


Overwatch offers inventive and varied action tha's always fun.It has a diverse set of characters(21 to be exact)and abilities.Above all this game can constantly surprise you!

There are only two cons that I could note.First,The walk back into the battles can sometimes be bit of a drag.Second,If you are in a bad team,you may not enjoy the game as much.


Overwatch is a first-person shooter that oozes personality and charm, but beyond that surface layer lies a deep, tactical game where your most powerful weapon is your brain. If, like me, you’ve recently fallen out of love with online first-person shooters, play Overwatch long enough for it to deliver one of its many standout moments and you’ll be renewing your vows in no time.


.

Monday 30 May 2016

Facebook clone Starcon becoming viral:Best Korean social network

If you think Facebook's gotten a little too big and you miss the intimacy of a smaller social network, maybe give North Korea's version a try.


Go to starcon.net.kp and you'll find a very familiar looking website. It's called "Best Korea's Social Network" and the homepage has a thin blue banner at the top with a search field for "people, #hashtags, !groups." etc.
After you register for an account, you can upload a cover photo and profile picture, find friends and message them, post a status message and scroll through a News Feed.


The site has already attracted a number of curious Internet surfers to sign up, but there isn’t much to see. It’s devoid of content except for a few messages users outside of North Korea are posting.

North Korea internet laws are notoriously strict. The vast majority of citizens are banned from using the internet and those allowed are monitored closely.

Not long after it emerged on Friday the site existed, it was quickly hacked. Scottish teenager Andrew McKean told Mortherboard that he was able to log into the website’s backend by simply using “admin” and “password” as the login details.

This gave the 18-year-old full control over the site, including the ability to “delete and suspend users, change the site’s name, censor certain words and manage the eventual ads,” as well as being able to “see everyone’s emails”.

It's unclear when exactly the site launched, or how many people have already signed up.


Dual-Boot Ubuntu 15.04/14.10 And Windows 10/8.1/8: step By Step Tutorial With Screenshots

 Dual-Boot Ubuntu 15.04/14.10 And Windows 10/8.1/8: step By Step Tutorial With Screenshots

 There are many of us want to use Windows and Ubuntu both at the same computer but dual booting does not seem easy to everyone. In this article I'll show you how you can dual boot your computer with Windows 10/8.1/8 and Ubuntu 15.04/14.10.

I assume that you've already installed Windows.
    Dual-Boot Ubuntu 15.04/14.10 And Windows 10/8.1/8: Step By Step Tutorial With Screenshots
  • First of all save all of your important files so that any a does not loose any relevant files.
  • Save data either in pen drive or any external hard drive or whatever source you use to save your data just save it.
STEP 1: Now our first step starts with inserting Ubuntu bootable DVD/Pendrive. 
              If you have pendrive then make sure you've set your system boot from Pendrive. 
              If you have not set it up then open BIOS setup. From BIOS, goto Boot tab and select boot                       preference and select your pendrive at primary boot. 
              Now save settings and reboot your system.


System should bootup from Ubuntu Bootable Pendrive. Just wait untill you get option to “Try Ubuntu” or “Install Ubuntu”. 

Install Ubuntu Or Boot live ubuntu


STEP 2: Click Try Ubuntu and you will be booted to Ubuntu Live. Here you can test several features and look and decide further to install it or not. Now you see an icon on the desktop “Install Ubuntu”, click it.
Picture

STEP 3: A setup window will popup asking for language selection. Select your preferred language from left sidebar and click 'Continue'. The next screen shows couple of options to select. If you are connected to the internet, click the checkbox 'Download updates while installing'. This option downloads and installs all available updates (skip this step if you want to download & install updates after Ubuntu installation). Click second checkbox 'Install this third-party software'. This options installs third-party software such as codecs and more. Although you can install codecs after installing Ubuntu but if you install here then you can play everything just after installation is done. Now click Continue.

STEP 4: Select your preferred

Install Ubuntu 15.04 select language


STEP 3: Download and install updates


install linux ubuntu vivid vervet


STEP 4: It is the most important step. You have three options available first is 'Install Ubuntu alongside Windows' , second is 'Replace Windows with Ubuntu” and third option is “Something else”. If you want system to partition the hard-disk and install Ubuntu alongside Windows then selectfirst option. If you want to remove Windows completely and install Ubuntu then choosesecond option and third option what we are going to select in this tutorial is “Something else”. This is the very convenient option. I can partition hard-disk as I want without removing Windows.

Choose 'Something else' and continue. The following screen would have all the partitions available at your disk, including the Windwos partition and free space. (Be very careful before you select any partition). Select free space and click '+' (plus) sign below left side of window. Now it's the main part but before that let me tell you what partitions are needed to install Ubuntu. We need to create minimum three partitions namely '/' (root)swap and /home.  

Root '/'

root is the partition that contains all of your system and applications file. For example, when you install any application, the related files are stored into root partition. Nothing from this partition can be deleted without root user permission. root partition is symbolized as '/'.

root partition should be more than 25GB. This size will not cause trouble for you in future. You can easily install large applications.

Swap

swap is the partition that is used as RAM (Random Access Memory). In case your RAM is full, system will use swap as a RAM. swap is also used when user hibernates the system. The hibernate session is saved in swapswap size should be double the size of RAM but if your RAM is 8GB or more then keep swap 8GB. It's should be enough.

/home

/home is the partition that contains all users data. Like in Windows users have different partitions to store data and one partition has OS. /home is like the partitions that contains all users data, such as, documents, music, movies, games setup etc. You can specify any size for/home depending on your use. If you have large amount of files then make it large.

Now that we know what root '/', swap and /home partitions are, let's move on to the main step. First create root partition where we'll install our Ubuntu. Enter size in MB (1024MB = 1GB). Click 'Primary' and click 'Begining of this space'. Choosing Begining of this space creates this partition first and rest of other after. From drop down choose 'Ext4 journalising file system'. There are couple of other filesystems but Ext4 is faster and work perfectly fine with Linux. In last, choose Mount point as '/' root from drop-down menu. And click 'OK'. You've created root partition.  

create root partition to install Ubuntu


Create the last '/home' partition in the same way as above partitions were created. Select free space and click '+' sign and enter size of /home partition. Jump to 'Use as' and select 'Ext4 journalizing file system, select 'Mount point' as /home and click OK. You're all done!

Click continue and it will give last prompt to check if all the partitions are okey. Click Continue if everything is fine. 

create swap partition to install ubuntu


Select rest of the free space again and click '+' (plus) sign. You'll get the partition creation window. Enter the size for swap and and select rest of the options and select 'swap area' fromuse as drop-down menu. This selection will hide the last option 'Mount point'. Click OK and you're done.

confirm/create partitions to install ubuntu


If you followed everything correctly you should get to select Time Zone. Select Time Zone and continue.
Select Keyboard layout and click Continue.

Complete all fields in the next window. Your name, You computer's nameusernamepassword(twice) and select if you want to login automatically or require to enter password to login. Click Continue and istallation will start. It should not take much time. Just 5 minutes or so. If you're downloading updates then this may take more time depending on your internet speed. If you want to skip downloading, expand the status bar and click 'skip' multiple times.

When installation is completed you'll get popup to restart Live Ubuntu to Ubuntu or Continue Testing. Click Restart and you're all done. Plug-out Pendrive or eject DVD and now whenever you boot, the grub menu will give you two operating systems to select, Windows and Ubuntu. Select Ubuntu and you are done.

Congratulation! You now have two operating systems installed. Select anyone from grub menu and work without any problem.
Restart ubuntu live disk to continue using Ubuntu


Batman tech now available for smartphone!!!!!!!!


Engineers from University of Michigan have developed a Batman-inspired software that can allow users to command their smartphones with sense force or pressure on its screen or body.


" ForcePhone offers" a new way -- like squeezing yoursmartphone to make a call -- to bring pressure-sensitive display technology, similar to the 3D Touch functionality that debuted on the iPhone 6S to any smartphone .


The researchers used ultrasonic waves to replicate the effects of 3D Touch without the need for a special screen technology.

"You do not need a special screen or built-in sensors to do this. Now this functionality can be realised on any phone," said Kang Shin, professor of computer science in electrical engineering.


See this video for more details:


The software could also enable users to push a bit harder on a screen button to unlock a menu of additional options, similar to right-clicking with a mouse. The developers envision these and many other uses for their technology, which could offer the masses a coveted feature of the latest generation of smartphones.

The iPhone 6s has a force-sensing screen but the less expensive iPhone SE does not. No commercially available device has a pressure-sensitive body.

"You don't need a special screen or built-in sensors to do this. Now this functionality can be realized on any phone," said Kang Shin, the Kevin and Nancy O'Connor Professor of Computer Science in the U-M Department of Electrical Engineering and Computer Science. "We've augmented the user interface without requiring any special built-in sensors. ForcePhone increases the vocabulary between the phone and the user."

Shin created the system with Yu-Chih Tung, a doctoral student in the same department.

"I think we're offering a natural interface, like how you turn a knob," Tung said. "It's the next step forward from a basic touch interface and it can complement other gestured communication channels and voice."

ForcePhone works by borrowing two of a phone's fundamental attributes—its microphone and speaker. The software sets the speaker to emit an inaudible tone at a frequency higher than 18 kHz, which is outside the range of human hearing. But the phone's mic can still pick up the vibration caused by the sound.

When a user presses on the screen or squeezes the phone's body, that force changes the tone. The phone's mic can detect that, and the software translates any tone tweaks into commands.

"Having expensive and bulky sensors installed into smartphones can solve every problem we have solved, but the added cost and laborious installation prevent phone manufacturers from doing it," Tung said. "Our sound-based solution can fill this gap, providing the functionality without making any hardware modification. Everything is just software."

The idea of harnessing the phone's microphone and speaker for other purposes is an approach Tung initially picked up from the 2008 Batman movie, "The Dark Knight." In the film, Batman turns all the smartphones in Gotham City into a sonar system as high-frequency audio signals bounce off the city's infrastructure. He uses them to track the Joker.

"I thought it was an interesting idea to turn smartphones into a sonar-based system and felt this could lead to new applications to address challenges faced by smartphone users," Tung said.

ForcePhone is the third piece of software based on this idea. Previously, Tung and Shin created BumpAlert, an Android application designed to warn distracted pedestrians of objects in their path, and EchoTag, which let phones tag and remember specific indoor locations and associate those places with certain modes or tasks.

BumpAlert uses the phone's speaker and microphone to create an acoustic detector; its accelerometer to estimate motion and speed; and its rear camera to identify dangerous objects in the path. An algorithm combines the data and warns walkers by vibrating. EchoTag works by sending out inaudible tones and picking up how they're reflected. It can do things like turn on an alarm clock or enable silent mode when you set a phone on a nightstand at the end of the day, for example.

While BumpAlert and EchoTag used sonar to create new applications for smartphones, ForcePhone builds more fundamentally on core interactions a user can have with a phone.

Shin is a leader in developing applications for mobile devices. Software he developed called E-MiLi, which stands for Energy-Minimizing Idle Listening, could extend smartphone battery life by as much as 54 percent. Another system called GapSense helps reduce dropped calls and wireless device interference.

The researchers will present their newest software, ForcePhone, June 27-29 in Singapore at MobiSys 2016, the Association for Computing Machinery's international mobile systems and applications conference.

All You Need is an Aluminium Foil to Boost Your WI-FI Strength and Here’s How

Are you looking for ways to boost the signal strength of that wireless router in your home without having to spend extra for a Wifi extender? Is your crappy Wi-Fi signal preventing you from uploading an inspiring Facebook status? It’s pretty much hard for your Wi-Fi connection to reach all the four corners of your home, apart from the garden and beyond. To take your computing to the distance, you’ll need to severely increase your Wi-Fi signal strength.

Wi-Fi is an essential component for everyone these days as our works almost rely on the internet. However, the current generation is very busy with a hectic schedule, and it is very hard to work on the sluggish internet connection. Weak Wi-Fi signal is a common problem, especially if the router location is distant from the receiver device, to maintain signal strength there’s a simple and easy way to increase your Wi-Fi signal strength.
How to Increase your wifi signal strength using aluminum foil
Without expending too much cost for purchasing another Wi-Fi range extender or buy for new router to make a good signal, some aluminum foil will do the trick. Surprised? Yes, you heard it right! Simply head over to the kitchen and grab some Aluminum foil that is commonly used by your mother for cooking or for wrapping sandwiches so that they stay fresh a little longer. This inexpensive aluminum foil can do the task of boosting the Wi-Fi signal strength.

How to Boost Wi-Fi Signal Strength using Aluminum foil?

Here’s a step-by-step procedure on how to increase your Wi-Fi signal strength using an aluminum foil. Check out the simple process!
Things Required
  • Aluminum Foil
  • Scissor (optional)
  • Router
Step 1: Initially, cut or tear off a piece of aluminum foil in the shape of a rectangle. Fold all the surrounding edges to appear as a frame and give it a curve shape.

Step 2: Add some stability in order to withstand and place the foil behind the antenna of your router.
Step 3: The aluminum foil will reflect the wireless signals by making the signal focus into the selected directions of your house.
Step  4: If your router is mounted on a wall, you can just make holes in the Aluminium foil and insert the foil into the holes of the antenna.
WATCH THIS VIDEO FOR MORE DETAILS

Step  5: After placing the aluminum foil behind your router, you can observe the change in the Wi-Fi signal strength.
This way you can increase the signal strength of your Wi-Fi network so that you can upload o download files in a faster way.

Secret WhatsApp Tips and Tricks You Probably Don’t Know


WhatsApp is definitely the best mobile messaging app ever made for Android, iPhone, Blackberry, Nokia & Java Mobiles. If you have active Internet connection on your mobile phone, then with the help of this app you can send unlimited messages, videos, audios, images to anyone. As we all know that the WhatsApp’s popularity has grown so popular that many WhatsApp tips and tricks coming in the internet. It is estimated that WhatsApp has more than 400 million active users around the world. Due to it’s fast message delivery service and some other cool features many people were attracted towards it. Here in this tutorial we are sharing some of the best Whatsapp Tips and Tricks Collection for every user who are using Whatsapp app on their mobile phones or PC.


1. Use WhatsApp without your Mobile Number

You can use WhatsApp without number that means not with your own number. So this trick may help you to do that easily and you can activate WhatsApp with a number which is not your own i.e fake. Just follow the below steps and enjoy.
  • If you are already using WhatsApp, uninstall it from your device completely. Download and install it again.
  • Lock your messaging service simply by changing the flight mode.
  • Now open WhatsApp and add your number to it. So it will not be able to send the message to the server it will ask you to choose an alternative method to verify.
install-whatsapp-without-phone-number
  • Choose the verify through message option and fill up your email address and then Click on ‘Send’ option and without waiting click on ‘Cancel’. This terminates the authorization process.
  • Now, you are required to forge messages. Install the message Spoof text message for Andriod and Fake- a- Message for iPhone.
  • Spoofing method: Go to your Outbox -> Copy the message details to spoofer app -> Send it to spoofed verification.
  • Use the following details.
    To: +447900347295
    From: +[Country code][mobile number]
    Message: Your email address
  • A message will be sent through that spoofed number. You can use this number to connect with your friends

2. Hide “Last Seen” Timestamp

By default, WhatsApp shows a “last seen” timestamp, telling other users the last time you were on WhatsAppIt’s a great feature, but the function becomes really annoying because it reveals whether you are online or not. You can not hide from your friends and they’ll keep talking to you. So if you want to hide this ” last seen in the” time stamp follow the below mentioned steps.
hide-last-seen-on whatsapp
Earlier there are many third party Applications available in Google Playstore to hide ‘last seen’ feature. By the recent update, you can use this feature without installing any other apps.
  • Download the latest version of WhatsApp from the official website to enjoy this feature.
  • To hide last seen feature, Open WhatsApp, Go to Settings > Account > Privacy > Last Seen.
  • There you can select three options, Everyone, My contacts, Nobody. Select any one of them.

3. Spy and Read the Conversation of Your Friend

Is it possible to Spy into Whatsapp conversation of the your close friends and read their conversation? Yes, it is possible and i’ll explain you about this awesome trick through which you can spy your friend conversation. Just follow the below mentioned steps.
hack your friends whatsapp chat
  • Firstly, you need to do is, go to the MicroSD card and then click on the Whatsapp and later on on the Database option.
  • Immediately after you are done with the first step you’ll get two files such as,msgstore-yyyy..dd..db.crypt
    msgstore.db.crypt
  • After finding these two files, you just need to do is take these files from your friends mobile and then you will be easily able to read their conversations that they have done with their friends. You can open them using a simple text editor.

4. Backup And Restore WhatsApp Chats

WhatsApp makes automatic backups of your chats, but you can also make a manual backup. Follow these simple steps to restore your whatsapp chats.
whatsapp_android_restore_backup
  • On iOS, Go to Settings > Chat Settings > Chat Backup, then click Backup Now.
  • On Android, just go into Settings > Chat settings and tap Backup conversations to create a backup.
  • It will not backup your media, so you will need to use a file manager to backup the media files in /sdcard/WhatsApp/Media on your mobile.
  • There’s no way to restore chats directly from WhatsApp, so if you want to restore a backup just uninstall and reinstall WhatsApp.
  • While you begin WhatsApp just after the reinstalling your app, you should be prompted to restore your most recent backup.

5. Send files of other Extensions like Zip, Rar, PDF


share-pdf-exe-zip-apk-with-whatsapp
  • We all know that WhatsApp doesn’t support to send other files than audio and video formats. There is not any option to share documents, compressed files, and other files using WhatsApp. But with an additional app like Cloud Send you can send PDFs, APKs, Word documents and more using WhatsApp.
  • You can also use third party app like Whats Packed 2 ads to send any files of any size via WhatsApp. But make sure that both the sender and receiver must have Whats Packed 2 ads application installed on their smartphone.

6. Disable WhatsApp Auto Image Download

By default WhatsApp download all images, videos and voice notes to your memory which will create lot of mess in your gallery. Sometimes this may kill your mobile data and battery life when you have a very low data balance on your mobile. So this trick will be helpful to stop auto download of images or video.
Settings > Chat Settings > Media Auto Download. Select an option from all three which suits you.  If you want to completely disable auto download, make all options to No Media.
Diable-auto-download-of images videos in whtasapp

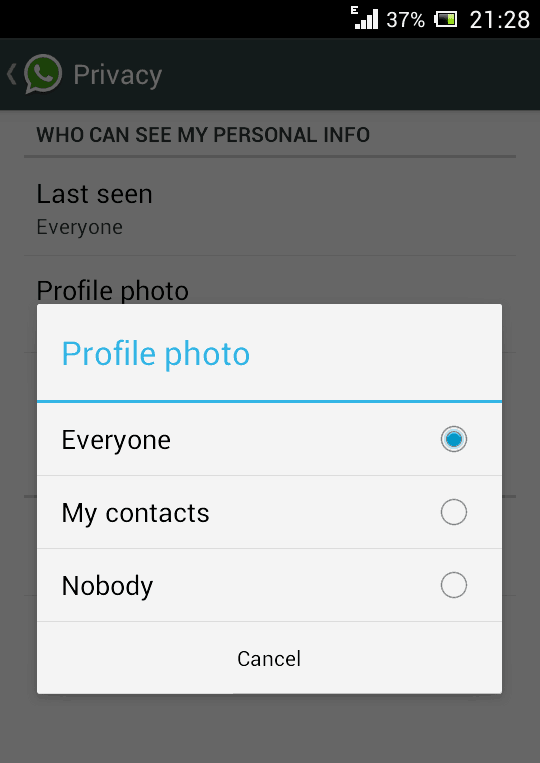
7. Hide your WhatsApp Profile Picture(DP)

Due to privacy concerns , or anything else , if you want to hide your profile picture this trick will definitely help you. Hiding Profile Picture option is only available for the latest version of WhatsApp. If you are not using latest version then download it and after installing go to Settings > Account privacy. Then click on Profile Photo, select any of the three options according to your needs – Everyone, My contacts, Nobody.
hide-profile-pic-whatsapp

8. Change Your Friend’s Profile Picture

You can change your friend’s profile pic into your WhatsApp by using this new and an awesome trick to prank your friends. Follow the below mentioned easy steps to do it.
Change Your Friend’s Profile Picture on whatsapp
  • Choose a profile picture for your friend. Use Google Image search for cute looking monkeys and donkeys or weird looking people.
  • Resize the image to 561×561 pixels using Paint or Photoshop and name it with your friend’s mobile phone number.
  • Save the image to the SD >> card WhatsApp >> Profile Pictures. Overwrite the existing file (if necessary).
  • Disable WiFi and data network. If you don’t WhatsApp will automatically update the picture.
  • Now, you show your friend the pic your profile WhatsApp instant panic invite her face.
Note: This is not a hack, but simply a trick to change your friend’s profile picture only on your device. This is meant for fun purpose only.

9. Create A Fake / Chat Conversation

This trick is going viral these days and many people are creating funny fake conversations and posting the screenshots over social media like Facebook and Google Plus. By using an app like WhatSaid-Whatsapp Prank you can easily create fake conversations and play pranks on your friends.

Download WhatSaid App Here

Whatsaid - Whatsapp Prank app for whatsapp
You will be able to create fake conversations with anyone by adding your photos, name it and create your own posts ( on both sides). Don’t use it to spoil someone’s life please.

10. Hide Two Images In One

Do you want to send an image to your WhatsApp friend which will first look like a beautiful one but when he/she click on it, the image will change to another one? Then just follow below steps…
magiapp for whatsapp

  • Now after installing this wonderful app just fire it up and then you will see interface something lie in the image on the right.
  • Now just click on the True Image option and choose your original image and then click on the Fake Image option and choose your pranky image.
  • Now after selecting your images just press Do Magic ! option and voila! its done now just share your image with everyone.