
Clean and boost your PC/laptop in any Windows PC without using any software or applications
Clean and boost your PC/laptop in any Windows PC with Disk Cleanup

During the normal use of your computer, you will accumulate a number of unnecessary files (temporary setup / internet files, recycle bin, etc.). You can remove these files with the built-in Disk Cleanup (cleanmgr.exe) utility inside of Windows . When it comes to computer repair, I use it all the time on my clients systems. And it can be run a couple of different ways and withdifferent options.
Running Disk Cleanup on demand
There are a couple of different ways to run Disk Cleanup on demand. The following procedure cleans up files associated with your user account. You can also use Disk Cleanup to clean up all the files on your computer.
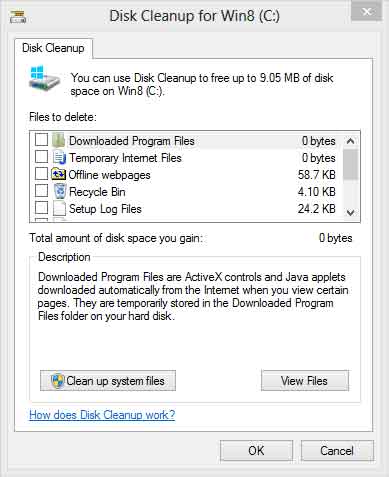
Windows 8 Disk Cleanup dialog box with standard options
- On the Start menu, swipe in from the right side of the screen or press the Windows logo key
 + C to bring up the Charm bar.
 - Left-click on Settings button in Charm Bar.
- Left-click on Tiles in Settings.
- Drag the Show/hide administrative tools slider to the Yesposition.
- Left-click on background of the Start menu, making the Charm bar disappear.
- Once the administrative tools appear, left-click on Disk Cleanup.
or
- Swipe in from the right-side of the screen or press the Windows logo key + C to bring up the Charm bar.
- Left-click on Search button in Charm Bar.
- Left-click on Apps in Search.
- Type Disk Cleanup in the Search field on the Search pane.
- In the results on the left hand side, left-click on Disk Cleanup.
After you select the drive you want to clean, Disk Cleanup scans it for possible files to delete. It then allows you to select which files to delete. When you click the Clean up system files button it restarts with a More Options tab. This tab includes two additional ways to free even more disk space:
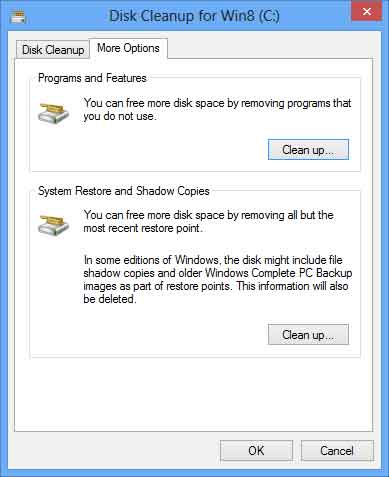
Windows 8 Disk Cleanup dialog box with more options
- Programs and Features. This option opens Programs and Features in Control Panel, where you can uninstall programs that you no longer use. The Size column in Programs and Features shows how much disk space each program uses.
- System Restore and Shadow Copies. With this option, you can delete all but the most recent restore point on the disk.
System Restore uses restore points to return your system files to an earlier point in time. If your computer is running normally, you can save disk space by deleting the earlier restore points.
In some editions of Windows 8, restore points can include previous versions of files, known as shadow copies, and backup images created with Windows Complete PC Backup. These files and images will also be deleted.
Running Disk Cleanup with predefined options
You can also run Disk Cleanup from a command prompt. This gives you the option of predefined settings for running Disk Cleanup as scheduled task in Task Scheduler or a shortcut on your Desktop or Start menu. Click here for more information on how to open a Command Prompt with Administrator privileges in Windows 8.
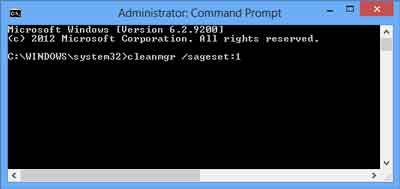
Windows 8 Disk Cleanup run at a Command Prompt with sageset option
You can start the Disk Cleanup tool by running cleanmgr.exe. Disk Cleanup supports the following command-line switches:
- cleanmgr /d driveletter: - This switch selects the drive that you want Disk Cleanup to clean. Note that the /d switch is not used with /sagerun:n.
- cleanmgr /sageset:n - This switch displays the Disk Cleanup Settings dialog box and creates a registry key to store the settings you select. The n value is stored in the registry and allows you to specify different tasks for Disk Cleanup to run. The n value can be any integer value from 0 to 65535. To get all the available options when you are using the /sageset switch, you may need to specify the drive letter that contains the Windows installation.
- cleanmgr /sagerun:n - This switch runs the specified tasks that are assigned to the n value by using the /sageset switch. All drives in the computer will be enumerated, and the selected profile will be run against each drive.
To run Disk Cleanup with the /sagerun:n switch in Task Scheduler or in a Desktop or Start menu shortcut, you would use something similar to the following:
C:\Windows\System32\cleanmgr.exe /sagerun:n




 Posts
Posts

