Showing posts with label steps. Show all posts

Tuesday, 31 May 2016

Hide hard disk or partition inside windows(XP/VISTA/7/8/8.1/10) without using any software or application

note:You should first sign in using an administrative account for              doing this.


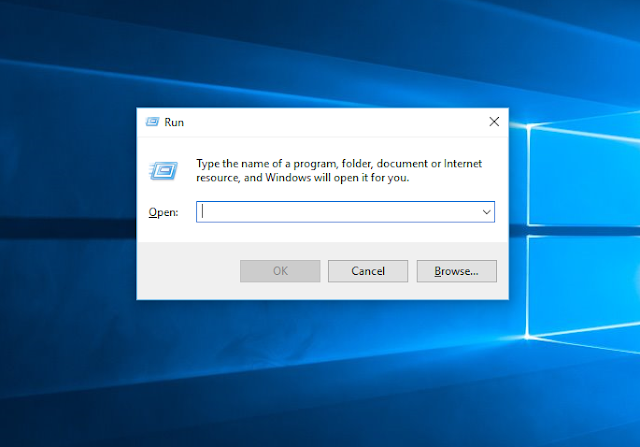
STEP 1: Press window key + R or select Run from start menu                   to launch the Run window.


STEP 2: Type in diskmgmt.msc and press enter key/ok button.

   
   STEP 3 : The disk management windows opens.

 STEP 4 : Right click on the partition/local disk to be hidden                      and select change drive letter and paths


STEP 5 : On the pop-up windows click remove button and then                 click ok 


   Now u can see that no label is displayed on your drive.


  The drive will not be visible in windows explorer ,this PC/My    computer etc. This is the safest way of hiding a whole    partition/local disk since there is no data loss or fragmentation  in this method.

The partition can be made visible by following steps 1 to 4 and then in the pop-up windows click add . Then click ok in the new popup window.


Now you can see that the drive letter or label reappears.


The partition will reappear in  explorer, my computer etc.


Monday, 30 May 2016

Dual-Boot Ubuntu 15.04/14.10 And Windows 10/8.1/8: step By Step Tutorial With Screenshots


 Dual-Boot Ubuntu 15.04/14.10 And Windows 10/8.1/8: step By Step Tutorial With Screenshots

 There are many of us want to use Windows and Ubuntu both at the same computer but dual booting does not seem easy to everyone. In this article I'll show you how you can dual boot your computer with Windows 10/8.1/8 and Ubuntu 15.04/14.10.

I assume that you've already installed Windows.
    Dual-Boot Ubuntu 15.04/14.10 And Windows 10/8.1/8: Step By Step Tutorial With Screenshots
  • First of all save all of your important files so that any a does not loose any relevant files.
  • Save data either in pen drive or any external hard drive or whatever source you use to save your data just save it.
STEP 1: Now our first step starts with inserting Ubuntu bootable DVD/Pendrive. 
              If you have pendrive then make sure you've set your system boot from Pendrive. 
              If you have not set it up then open BIOS setup. From BIOS, goto Boot tab and select boot                       preference and select your pendrive at primary boot. 
              Now save settings and reboot your system.


System should bootup from Ubuntu Bootable Pendrive. Just wait untill you get option to “Try Ubuntu” or “Install Ubuntu”. 

Install Ubuntu Or Boot live ubuntu


STEP 2: Click Try Ubuntu and you will be booted to Ubuntu Live. Here you can test several features and look and decide further to install it or not. Now you see an icon on the desktop “Install Ubuntu”, click it.
Picture

STEP 3: A setup window will popup asking for language selection. Select your preferred language from left sidebar and click 'Continue'. The next screen shows couple of options to select. If you are connected to the internet, click the checkbox 'Download updates while installing'. This option downloads and installs all available updates (skip this step if you want to download & install updates after Ubuntu installation). Click second checkbox 'Install this third-party software'. This options installs third-party software such as codecs and more. Although you can install codecs after installing Ubuntu but if you install here then you can play everything just after installation is done. Now click Continue.

STEP 4: Select your preferred

Install Ubuntu 15.04 select language


STEP 3: Download and install updates


install linux ubuntu vivid vervet


STEP 4: It is the most important step. You have three options available first is 'Install Ubuntu alongside Windows' , second is 'Replace Windows with Ubuntu” and third option is “Something else”. If you want system to partition the hard-disk and install Ubuntu alongside Windows then selectfirst option. If you want to remove Windows completely and install Ubuntu then choosesecond option and third option what we are going to select in this tutorial is “Something else”. This is the very convenient option. I can partition hard-disk as I want without removing Windows.

Choose 'Something else' and continue. The following screen would have all the partitions available at your disk, including the Windwos partition and free space. (Be very careful before you select any partition). Select free space and click '+' (plus) sign below left side of window. Now it's the main part but before that let me tell you what partitions are needed to install Ubuntu. We need to create minimum three partitions namely '/' (root), swap and /home.  

Root '/'

root is the partition that contains all of your system and applications file. For example, when you install any application, the related files are stored into root partition. Nothing from this partition can be deleted without root user permission. root partition is symbolized as '/'.

root partition should be more than 25GB. This size will not cause trouble for you in future. You can easily install large applications.

Swap

swap is the partition that is used as RAM (Random Access Memory). In case your RAM is full, system will use swap as a RAM. swap is also used when user hibernates the system. The hibernate session is saved in swap. swap size should be double the size of RAM but if your RAM is 8GB or more then keep swap 8GB. It's should be enough.

/home

/home is the partition that contains all users data. Like in Windows users have different partitions to store data and one partition has OS. /home is like the partitions that contains all users data, such as, documents, music, movies, games setup etc. You can specify any size for/home depending on your use. If you have large amount of files then make it large.

Now that we know what root '/', swap and /home partitions are, let's move on to the main step. First create root partition where we'll install our Ubuntu. Enter size in MB (1024MB = 1GB). Click 'Primary' and click 'Begining of this space'. Choosing Begining of this space creates this partition first and rest of other after. From drop down choose 'Ext4 journalising file system'. There are couple of other filesystems but Ext4 is faster and work perfectly fine with Linux. In last, choose Mount point as '/' root from drop-down menu. And click 'OK'. You've created root partition.  

create root partition to install Ubuntu


Create the last '/home' partition in the same way as above partitions were created. Select free space and click '+' sign and enter size of /home partition. Jump to 'Use as' and select 'Ext4 journalizing file system, select 'Mount point' as /home and click OK. You're all done!

Click continue and it will give last prompt to check if all the partitions are okey. Click Continue if everything is fine. 

create swap partition to install ubuntu


Select rest of the free space again and click '+' (plus) sign. You'll get the partition creation window. Enter the size for swap and and select rest of the options and select 'swap area' fromuse as drop-down menu. This selection will hide the last option 'Mount point'. Click OK and you're done.

confirm/create partitions to install ubuntu


If you followed everything correctly you should get to select Time Zone. Select Time Zone and continue.
Select Keyboard layout and click Continue.

Complete all fields in the next window. Your name, You computer's name, username, password(twice) and select if you want to login automatically or require to enter password to login. Click Continue and istallation will start. It should not take much time. Just 5 minutes or so. If you're downloading updates then this may take more time depending on your internet speed. If you want to skip downloading, expand the status bar and click 'skip' multiple times.

When installation is completed you'll get popup to restart Live Ubuntu to Ubuntu or Continue Testing. Click Restart and you're all done. Plug-out Pendrive or eject DVD and now whenever you boot, the grub menu will give you two operating systems to select, Windows and Ubuntu. Select Ubuntu and you are done.

Congratulation! You now have two operating systems installed. Select anyone from grub menu and work without any problem.
Restart ubuntu live disk to continue using Ubuntu


Saturday, 28 May 2016

Clean and boost your PC/laptop in any Windows PC without using any software or applications

Clean and boost your PC/laptop in any Windows PC  with Disk Cleanup


During the normal use of your computer, you will accumulate a number of unnecessary files (temporary setup / internet files, recycle bin, etc.). You can remove these files with the built-in Disk Cleanup (cleanmgr.exe) utility inside of Windows . When it comes to computer repair, I use it all the time on my clients systems. And it can be run a couple of different ways and withdifferent options.

Running Disk Cleanup on demand

There are a couple of different ways to run Disk Cleanup on demand. The following procedure cleans up files associated with your user account. You can also use Disk Cleanup to clean up all the files on your computer.
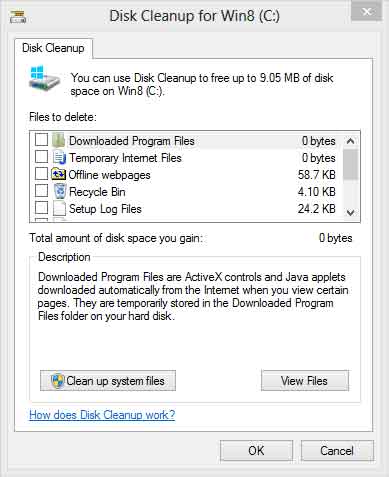
Windows 8 Disk Cleanup dialog box with standard options
  1. On the Start menu, swipe in from the right side of the screen or press the Windows logo key Windows logo key + C to bring up the Charm bar.
  2. Left-click on Settings button in Charm Bar.
  3. Left-click on Tiles in Settings.
  4. Drag the Show/hide administrative tools slider to the Yesposition.
  5. Left-click on background of the Start menu, making the Charm bar disappear.
  6. Once the administrative tools appear, left-click on Disk Cleanup.
or
  1. Swipe in from the right-side of the screen or press the Windows logo key Windows logo key + C to bring up the Charm bar.
  2. Left-click on Search button in Charm Bar.
  3. Left-click on Apps in Search.
  4. Type Disk Cleanup in the Search field on the Search pane.
  5. In the results on the left hand side, left-click on Disk Cleanup.
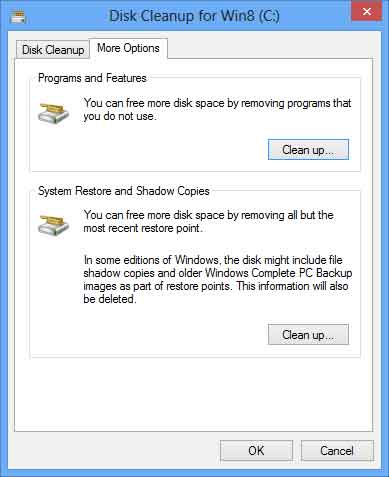
After you select the drive you want to clean, Disk Cleanup scans it for possible files to delete. It then allows you to select which files to delete. When you click the Clean up system files button it restarts with a More Options tab. This tab includes two additional ways to free even more disk space:
Windows 8 Disk Cleanup dialog box with more options
  • Programs and Features. This option opens Programs and Features in Control Panel, where you can uninstall programs that you no longer use. The Size column in Programs and Features shows how much disk space each program uses.
  • System Restore and Shadow Copies. With this option, you can delete all but the most recent restore point on the disk.
    System Restore uses restore points to return your system files to an earlier point in time. If your computer is running normally, you can save disk space by deleting the earlier restore points.
    In some editions of Windows 8, restore points can include previous versions of files, known as shadow copies, and backup images created with Windows Complete PC Backup. These files and images will also be deleted.

Running Disk Cleanup with predefined options

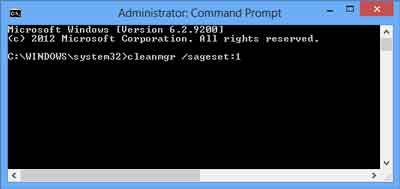
You can also run Disk Cleanup from a command prompt. This gives you the option of predefined settings for running Disk Cleanup as scheduled task in Task Scheduler or a shortcut on your Desktop or Start menu. Click here for more information on how to open a Command Prompt with Administrator privileges in Windows 8.
Windows 8 Disk Cleanup run at a command prompt with sageset option
Windows 8 Disk Cleanup run at a Command Prompt with sageset option
You can start the Disk Cleanup tool by running cleanmgr.exe. Disk Cleanup supports the following command-line switches:
  • cleanmgr /d driveletter: - This switch selects the drive that you want Disk Cleanup to clean. Note that the /d switch is not used with /sagerun:n.
  • cleanmgr /sageset:n - This switch displays the Disk Cleanup Settings dialog box and creates a registry key to store the settings you select. The n value is stored in the registry and allows you to specify different tasks for Disk Cleanup to run. The n value can be any integer value from 0 to 65535. To get all the available options when you are using the /sageset switch, you may need to specify the drive letter that contains the Windows installation.
  • cleanmgr /sagerun:n - This switch runs the specified tasks that are assigned to the n value by using the /sageset switch. All drives in the computer will be enumerated, and the selected profile will be run against each drive.
To run Disk Cleanup with the /sagerun:n switch in Task Scheduler or in a Desktop or Start menu shortcut, you would use something similar to the following:
C:\Windows\System32\cleanmgr.exe /sagerun:n

Wednesday, 25 May 2016

How to force windows 8/8.1 to go to the desktop instead of the Start screen when they signing in

Steps to force windows 8/8.1 to directly go to the desktop instead of the Start screen when they signing in

This setting allows users to go to the desktop instead of the Start screen when they sign in.

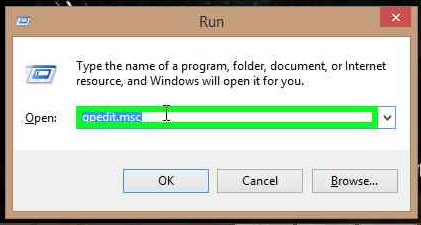
step 1: Open run ( Press window key + R)


Step 2: Type in gpedit.msc and press Ok.


Step 3: Click on Administrative Template at left side of the Local                group policy editor window.


Step 3: In the Administrative template double-click on Start menu                and Taskbar directory.


Step 4: Then double-click on Go to the desktop instead of start                    when signing in.

Step 5: On the new window click on enable


If you enable this policy setting, users will always go to the desktop when they sign in.

If you disable this policy setting, users will always go to the Start screen when they sign in.


If you don’t configure this policy setting, the default setting for the user’s device will be used, and the user can choose to change it.

Step 5: Then click ok.


Sunday, 22 May 2016

How to disable startup applications in windows PC(windows 8/8.1/10)

How to disable startup applications in 

Windows 10 PC 

This method is applicable in windows 8/windows 8.1/windows 10

STEP 1: Open taskmanager(don't know how? click here for tutorial )

                                               
STEP 2: click on start-up


STEP 3: Select the unnecessary application/program from the sart-up list (the program that you intent to disable from startup)


STEP 4: Click on disable button at the bottom right corner of                   the window. 


Now you can see that the application status is displayed as disabled. These disabled applications will not run at startup.